
by Kathryn Brenne


First things first! Test your fabric to determine the amount of stretch it has. Knit fabrics will, in most cases, have the most amount of stretch across their width and less or no stretch in their length. To do a stretch test, fold an edge down across the width of the fabric. Do not use the cut edge of the fabric as it will have greater stretch than the body of the fabric.
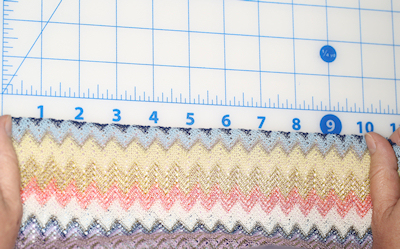
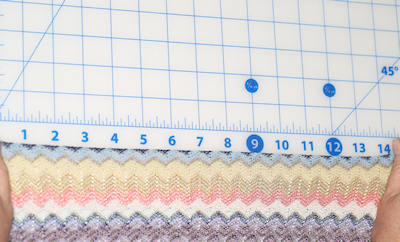
Grasp one side of the fabric in your left hand and using a ruler, align it at zero. Grasp a piece of fabric in your right hand 4" away from the left hand. Gently pull on the fabric measuring how much the fabric stretches. Do not overstretch or stress the fabric. Perform this test three times taking note of the recovery of the fabric. Does it return to its original spot on the ruler? Stable knits will have very little stretch and may only expand 1/2". Other knits will have greater stretch and may stretch 2" or more. Depending upon the fiber content, some knits will recover better than others.
On the back of many commercial patterns designed for knit fabrics you will find a printed ruler, which can be used to perform a stretch test. If your fabric does not stretch enough to meet the stretch test it is not suitable for that particular pattern. You can also start at 10", making it easier mathematically to figure the percentage of stretch. As an example, if it stretches comfortably to 14", that would mean approximately 40% stretch.
For knits with a greater amount of stretch, look for patterns that say "For Stretch Knits Only". These patterns are designed with a closer fit. For stable knits with little stretch, look for patterns with simple shapes and an easy fit. These patterns do not have to be specifically designed for knits; patterns for woven fabrics can also be used for stable knits.
Look for pullovers, cardigans, simple jackets, ponchos, wraps, easy coats and accessories like scarves, cowls or hats, and you needn't shy away from patterns with zippers, buttons or snap closures.
Sweater knits should be pre-shrunk according to fiber content and final care of the garment. For wool or wool blend knits, try hand washing a sample using a no rinse cleanser such as Eucalan™. Check for shrinkage and any change of characteristic or hand. For bulky sweater knits that will be dry cleaned, try this method for preshrinking: Fill a large bowl with water. Soak a large piece of muslin in the water and wring out excess. Lay the muslin over the bulky knit and press with the iron. The wet muslin will force steam into the knit, preshrinking the fabric. Carefully lift a section up and continue to treat the entire length of fabric, rewetting the muslin as needed. Once finished, the fabric will be damp. Lay the fabric out to completely dry before cutting.
Most cotton sweater knits can be hand or machine washed and dried. In general, cotton (without the addition of lycra) has poor recovery once it is stretched out. Machine drying can help ‘shrink' it back into shape. Always test your fabric for washability first with a small swatch. Finish the ends of your fabric first with a row of serge or zig zag stitching to prevent it from unravelling during preshrinking.
Some sweater knit fabrics have an uneven selvedge due to the way they are constructed. Instead of following the selvedge to place pattern pieces on grain, it is important to find the grain of the fabric by folding it along one of the vertical or lengthwise ribs. Don't worry if the selvedges don't match up. Use the rib as the grain line.
In most cases, finer knits can be cut as a double layer. Bulkier knits should be cut as a single layer for accuracy. It's best to use a rotary cutter when cutting sweater knits as there is less distortion, and weights, rather than pins, to hold the pattern pieces in place. If you prefer to use pins, make sure they are fine, ballpoint pins that won't damage your fabric.
Clips or notches usually don't show up well on sweater knits. Generally it's better to use basting cotton to thread-trace notches and make tailor's tacks. For some techniques a chalk wheel is useful. Test first to see if the chalk will show on your fabric and if it can be easily brushed away without leaving a mark. Chalk can be useful for marking hemlines or a neckline for the binding technique outlined below.
The best interfacings for sweater knits are fusible knit interfacings. Depending on the weight and stretch of the sweater knit, try using either a light weight tricot fusible or a bias knit fusible.
Always use a ballpoint needle when sewing or serging sweater knits. A ballpoint needle will prevent holes and runs from occurring in knit fabrics. Often confused with stretch needles, ballpoint needles have a slightly rounded tip and a gold colored shank whereas stretch needles have a sharper point. (Stretch needles are best suited for fabrics with a lot of lycra such as swimwear fabrics.) Use a size 70 for fine knits and a size 80 for heavier knits. Twin needles work well on sweater knit fabrics for creating your own ribbing and topstitching hems (see techniques below). Only use a twin needle on a straight stitch setting. The bobbin will automatically create a zig zag stitch with built in stretch. Twin needles are labelled according to needle size (the first number) and space between the two needles (the second number). If too wide a spacing is used on fine knits the two rows of stitching will pull together forming a tunnel rather than lying flat.
100% polyester all purpose thread is suitable for sewing sweater knits. For many serging and cover stitch techniques try using woolly nylon in the loopers and serging thread in the needles. The woolly nylon makes a puffed stitch which fills in nicely on knit fabric. For decorative seaming on stable knits I use Aurafil 100% Cotton Mako 12 weight thread with a size 90 - 100 topstitching needle. This thread does not shred as some other brands of topstitching thread do.
Whether you own a sewing machine, serger or cover stitch machine, there are several ways to sew sweater knits. Here are some tips on setting up your machines before you get started.
If you are using a sewing machine, try using a clear foot which allows you a better view of the stitching area. When working with bulky sweater knits it may be necessary to reduce the pressure on the foot of the sewing machine. A walking foot works great for bulky sweater knits, which can be difficult to feed into the machine.
If you own a serger, it is perfect for sewing and finishing sweater knits. A four thread serge will give two rows of stitching, which provides extra security in case one thread should break. It is important to adjust the differential feed according to the amount of stretch found in the fabric. To test the differential feed setting, serge two layers of your fabric together. Hold up the seam. If the edge ripples, the differential feed needs to be set higher. Ideally you should be able to hold up a seam and have it hang straight.
A cover stitch machine can be used to hem sweater knits. This machine creates two rows of topstitching on the right side of the fabric and a row of what appears to be serging on the wrong side, and the stitch has built-in stretch. For finer knits, set the two needles closer together, and for bulkier knits, use the wider needle settings.
Use a light touch when pressing sweater knits. Too much pressure may leave a mark on the right side of the knit fabric. Steam and finger pressing are often enough for most knits. Avoid ironing, which will stretch and distort knit fabric. Instead use a lift and press motion, and use a press cloth when pressing on the right side of the fabric.